 Ένα ακόμα πολύ καλό πρόγραμμα, για την ακρίβεια top είναι το Darktable Photo Workflow Software, το οποίο έχει πάρα πολλές επιλογές επεξεργασίας φωτογραφιών. Το μόνο που είναι σπαστικό είναι ότι δεν έχει κανονική αποθήκευση, πρέπει να μεταβαίνεις στο τέλος στην καρτέλα lightable και να κάνεις export όλες τις εικόνες που επεξεργάστηκες και θες να αποθηκευτούν σαν .jpg. Τέλος πάντων για να το εγκαταστήσει κάποιος μπορεί είτε μέσα από το ubuntu software center, ή με τις ακόλουθες εντολές (εκτελώντας τες μία-μία με την σειρά): sudo add-apt-repository ppa:pmjdebruijn/darktable-release It's easy to remove folder with the files inside via the terminal... But the "f" letter, ignores any warnings. rm -rf (folder)  Finally after too many tries i did it. I can use photoshop on ubuntu now. I had lost my faith that i will ever can use photoshop on ubuntu. I did the following steps: sudo add-apt-repository ppa:ubuntu-wine/ppa sudo apt-get update sudo apt-get install wine1.7 winetricks winetricks atmlib gdiplus msxml3 msxml6 vcrun2005 vcrun2005sp1 vcrun2008 ie6 fontsmooth-rgb gecko and then i downloaded the following Photoshop CS 6 Portable. Some people say that also normal (and not portable) photoshop CS 6 and CC can work on ubuntu with these steps... 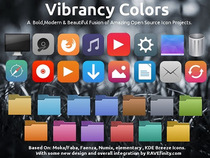 Επιτέλους και λίγο σχέδιο στο ubuntu...
Ανοίγω terminal με ctrl+alt+t και γράφω τις εξής εντολές: sudo add-apt-repository ppa:ravefinity-project/ppa sudo apt-get update sudo apt-get install vibrancy-colors και μετά ενεργοποιώ τα εικονίδια με το unity tweak tool.  Επιτέλους βρήκα την επιλογή να βάζω τα αρχεία να ανοίγουν με δεξί κλίκ και να τρέχουν σαν διαχειριστής και όχι κάθε φορά να ανοίγω το ηλίθιο terminal.
Ανοίγω το terminal με ctrl+alt+t και γράφω μία-μία τις εξής εντολές:
After installation type this command to restart Nautilus:

To Gis Weather έχει μία από τις πηγές το accuweather που είναι από τα πιο ακριβή μετεωρολογικά sites που υπάρχουν και το αγαπημένο μου... Έτσι βρήκα και το Gis Weather που είναι και πλήρη προσαρμόσιμο στις ανάγκες μου.
Ανοίγω το terminal με ctrl+alt+t και γράφω τις εξής εντολές: - sudo add-apt-repository ppa:noobslab/apps - sudo apt-get update - sudo apt-get install gis-weather It's little tricky but it not hard to do it.
Κόντεψα να τρελαθώ, έβαλα το compiz configuration και είπα να πάω να ενεργοποιήσω διάφορα εφέ για να μου αρέσει πιο πολύ... έχασα την μισή μου ζωή τελικά γιατί απενεργοποιήσα το unity, με αποτέλεσμα να μην φαίνεται ούτε το launchbar, το dash, αλλά και να μην ανοίγει το terminal... Απεριόριστες ώρες ψάξιμο μέσω του iphone για να δω τι μπορώ να κάνω. τελικά βρήκα το παρακάτω το οποίο και μου δούλεψε.
Ευτυχώς όλα καλά. Θα είχα τρελαθεί να χάσω τόσα αρχεία!
 Όπως όλες οι ρυθμίσεις στα linux είναι παλούκι, έτσι και αυτή δεν μπορούσε να ήταν εξαίρεση αλλά με αρκετό ψάξιμο και δεκάδες installs το κατάφερα!
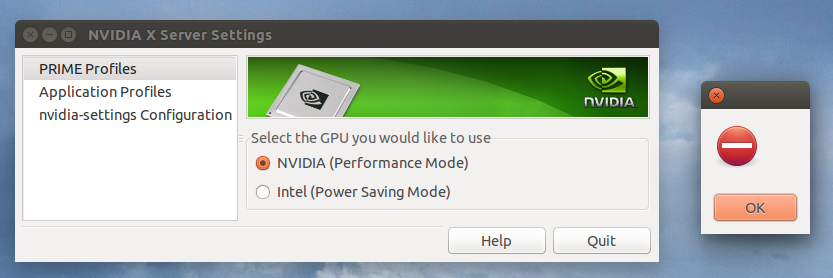
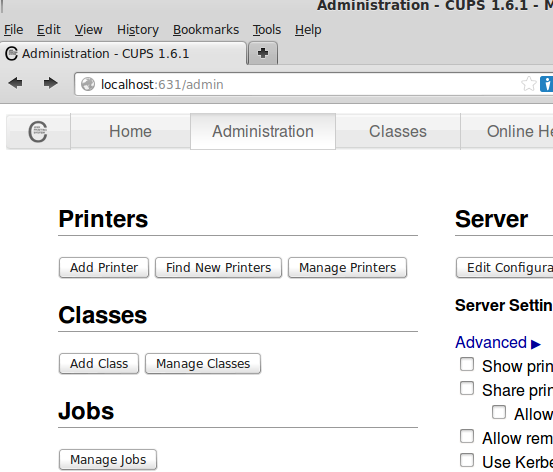
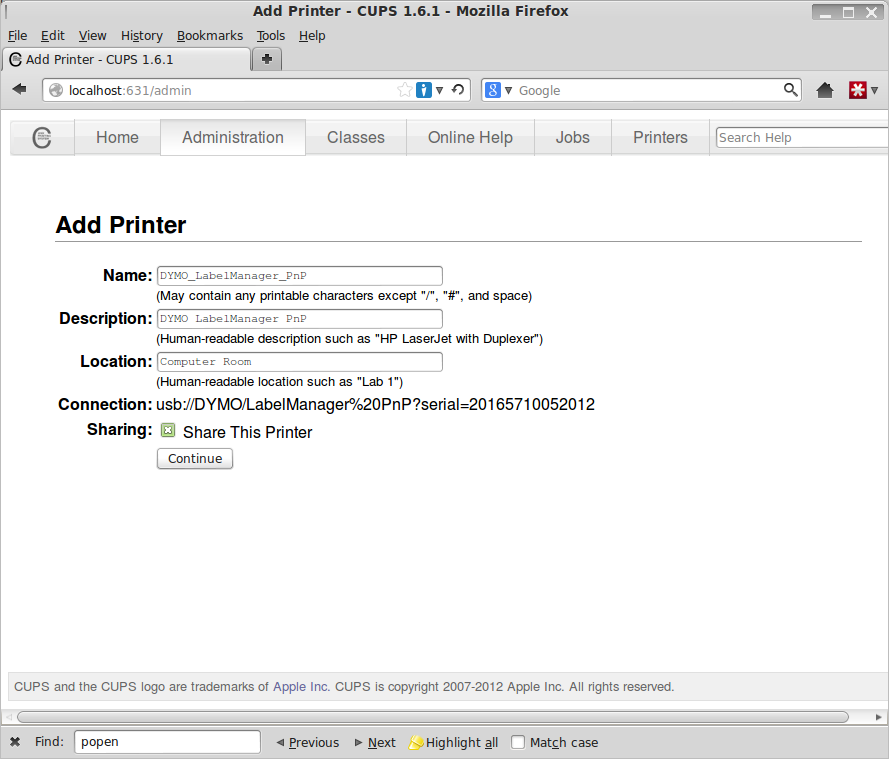
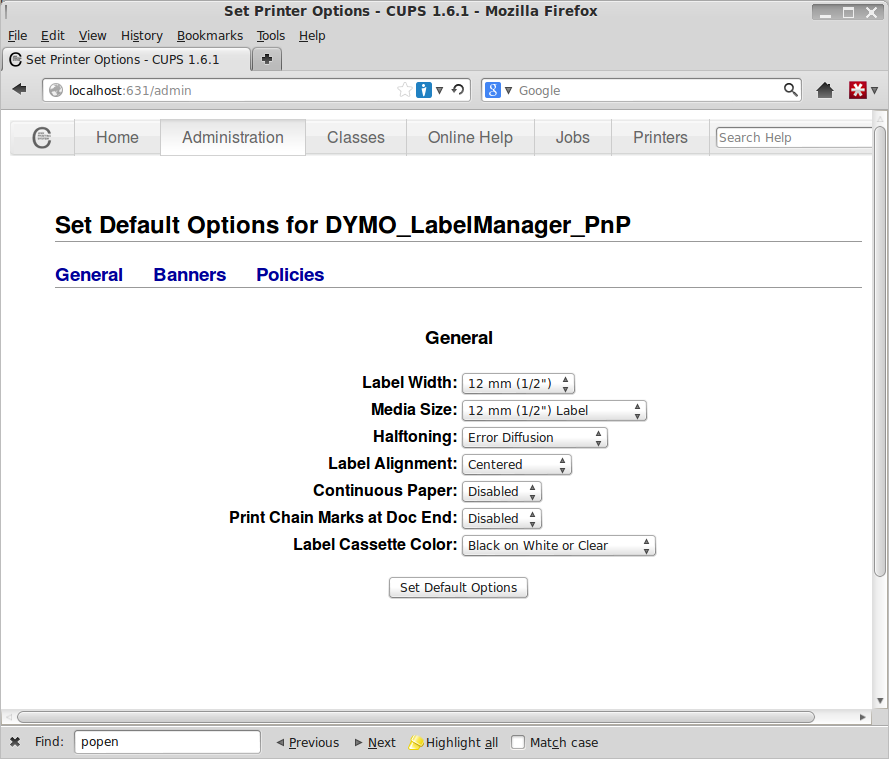
sudo add-apt-repository ppa:xorg-edgers/ppa -y sudo apt-get update sudo apt-get install nvidia-current Δοκίμασα μέσω του terminal: sudo update-alternatives --config x86_64-linux-gnu_gl_conf sudo ldconfig -n sudo update-initramfs -u Και επανεκκίνηση, χωρίς άλλες αλλαγές. Ξανά μέσω terminal: sudo apt-get purge libvdpau-va-gl1 bumblebee* nvidia* sudo apt-get install linux-headers-generic sudo apt-get install nvidia-331 nvidia-settings nvidia-prime Επανεκκίνηση. Εάν δεν έχει αλλαγή και έχεις πρόβλημα μέσα από το askubuntu.com σου λέει να κάνεις και το εξής μέσω terminal: sudo prime-switch nvidia και η ρύθμιση ανανεώθηκε. Θα χρειαστεί να κάνεις αποσύνδεση και να ξαναμπείς στο ubuntu και θα δουλέψει. ΠΡΟΣΟΧΗ: υπάρχει μεγάλο πρόβλημα έτσι και βάλει κάποιος να τρέξει σε GPU το NVIDIA (Performance mode) και θα κολλάει συνέχεια το laptop. Έτσι και κολλήσει η οθόνη μπορεί κάποιος να το ξαναρυθμίσει μέσω γραμμή εντολών, αλinλά και να μην μπορεί κάποιος να ανοίξει το terminal μπορεί να μπει μέσω alt+ctrl+f1, να βάλει το username και το password του και μετά να γράψει μόνο την 1η εντολή, η 2η είναι έτσι και θέλει να ξαναβάλει τους nvidia, ώστε να επανέλθει στους intel drivers... 1. sudo prime-select intel 2. sudo prime-select nvidia Επανεκκίνηση και είναι ΟΚ. The most difficult to make work when you go from windows to a linux distribution is that some programs or hardware you have is not working anymore. One of those is DYMO. I have DYMO labelwriter 450 and it was very difficult to find how can i print labels with my ubuntu system. And it was urgent because some times i print over 200 labels per month. So i give you as simple as can be how to install it and use your DYMO printer on ubuntu. I found the instructions on http://www.smartfruit.com/?p=188. Here is the step you need to use the Dymo on it. Step 1: Download Dymo Linux SDK. You’d get something like “dymo-cups-drivers-1.4.0.tar.gz“. Step 2: Install libcups2-dev libcupsimage2-dev sudo apt-get install libcups2-dev libcupsimage2-dev gcc g++ Step 3: Install the SDK mkdir dymo cd dymo tar xzf dymo-cups-drivers-1.4.0.tar.gz cd ./dymo-cups-drivers-1.4.0.5/ ./configure make sudo make install Now the driver is installed. Step 4: Set up the CUPS Now, go to the CUPS admin page. Don’t forget to connect the Dymo to your machine. Here are the screen shots of how I set it up. Step 5: Install gLabels gLabels is a GNOME application for printing labels. Thanks for whoever developed this. It is well designed and made. You can also find it in ubuntu software center. Step 6: Set up the template I had to try a few times to get the template working. Ones showing here is not 100%, but it is working OK. 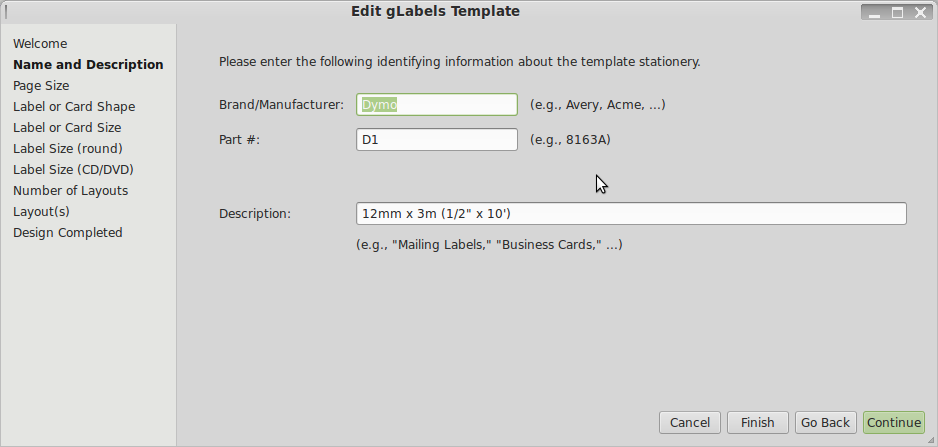 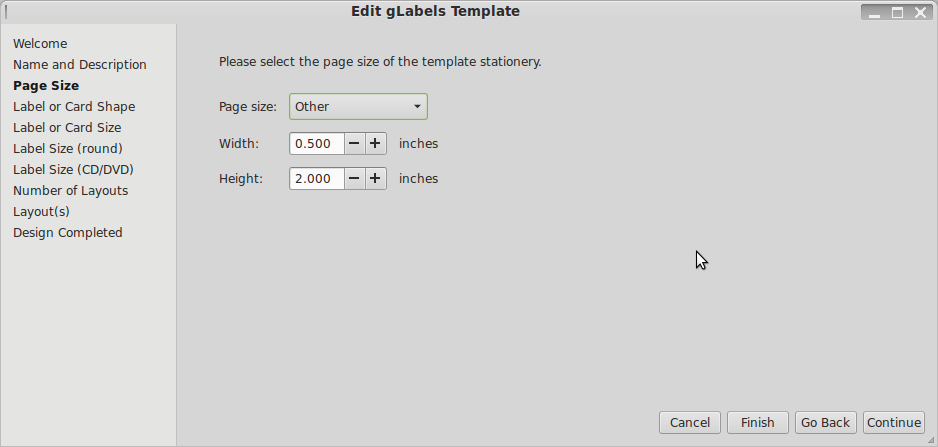  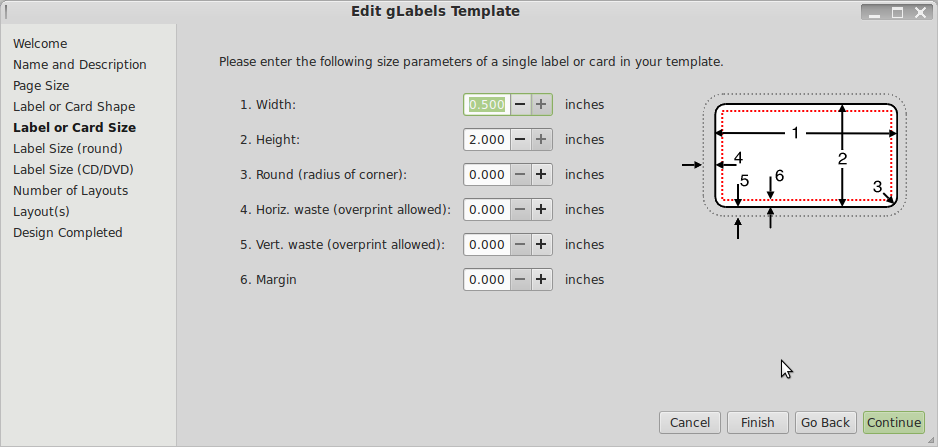 Step 7: Create a label.   Now, in gLabels, you create a label. New document and pick the template you created.
And you are ready to print! p.s. I hope i helped a lot! |
�
AboutVarious topics which don't belong to ecology, cooking, farming. Archives
December 2022
Categories
All
|


 RSS Feed
|
Chris Taklis - Marine and Conservation Biologist | Wildlife Photographer | Environmental Consultant | Citizen Scientist
If you have any concerns or disagree with the content on this website, please feel free to exit and explore other resources. |
|
© 2024 - Chris Taklis
|